To discuss how to organize and plan home repair, I would like to tell you a short story. A friend of mine (Mike, you know who you are!) told me recently that, “if I was organized, I would be dangerous.” We commented back and forth for a bit about some related character traits, but for some reason this familiar phrase stuck with me this time. How important is it to be organized, I thought. I can focus broadly on lots of things at once and still be effective, right?
Multi-task or not?
The truth is that I really can’t! Being organized and knowing what the tasks are and taking them one at a time in an intentional way is essential to being effective and victorious in any area of life. Getting organized and planned about your home repair is no exception.
With planning, what separates the leaders from the followers? It’s the ability to assess and plan for success and then work the plan to completion. I can hear you saying right now, “Yeah, I’ve heard this before. I plan everything.” My question to you is, do you?
Plan Everything!
How many of us have pulled the towel rack off its mount with the towel in the morning and said, “I’ve got fix that!”, only to be back in the same place the next morning. Or, if you’re a guy, have you ever found that your wife is discouraged by the failing appliance that has been broken for 6 months, but only seems like 6 days to you? Or if you’re a homemaker, has your family wanted to host a party or gathering for a while now, but just need to get the house in shape first?
To use my friend Mike’s term, I propose that “we would be Dangerous if we would just organize our home repair”!
How to Get Started
Why do we plan our child care, physical care, pet care, emotional care, and lawn care, but don’t plan our home care? I would like to change that. This year, I urge you to set aside planned time each month to evaluate and make repairs on your home. Some good questions to ask could be:
1. Do I know what to look for around my house to find problems that may exist?
2. Do I have a place to document the needed repairs that I find?
3. Do I have them prioritized in order of importance?
4. Do I have a plan to get them completed?
5. What would it take to work my home repair plan?
Could you spare one Saturday morning a month to get started? Identify all the items that you are aware of that need your home repair attention. Put them in one place and prioritize them. You might consider setting up a Trello account and making a board just for To Do items around the house. Make categories that make sense to you and prioritize within those categories. The account at Trello.com is free!
Unknown Repair Needs
Another point to consider is the repair needs that are not known. For example, another friend of mine, Ron, called me one early Sunday morning and said that he found 3″ of water in his entire basement and wondered if I had any advice on where to go next. I went over there to help him dry everything up and discovered that his sump pump was seized up and it was not running! The water problem was a result of one of the first heavy spring rains and frankly his entire lower level depended on that sump pump kicking on when it was needed, but it didn’t! This was an unknown repair that was needed. How do we plan to avoid these types of home repair disasters?
It is called monthly assessment.
A simple manual test of his sump pump at the right time of year would have revealed the ineffective culprit! Consider studying up on what components of your home need to be checked or assessed and when. By trial and error, you can come up with a pretty good list. Another option is to take advantage of subscription products that are available to you. By subscribing to our membership group on Facebook, you not only get the regular monthly assessment list of what to assess and when, but also tips and training from a pro! This is very inexpensive and, as my friend Ron will tell you, it will save you money in the long run!
Proactive Home Repair Community
Go to this link to learn more about our special group for those wanting to learn more in the year ahead about getting their home repair organized!
So as we all look to improve and grow in the new year ahead, I strongly recommend putting your home repair back on your radar. After all our houses aren’t just houses, they are what our family calls home. So commit this year to bringing your family home!
Take action:
1. Make a regular monthly appointment with yourself to dedicate to home repair
2. Set up a Trello account to list and prioritize your repair items
3. Subscribe to a very inexpensive monthly assessment program to make sure you know what to look for
4. Work the plan!
Get our free eBook that explains this in more detail!
My best to you all in the year ahead as you work to “Bring Your Family Home”!
If you would rather watch a video than read, then just click the video. It has all the same stuff!
What are Sump Pumps
Sump pumps are electric water pumps that take collected water below the surface of a basement floor and send it out of the house, usually into the yard.
Most sump pumps are submersible, which means that they sit in a sump basin under water and automatically turn on when the water level reaches a certain height. After running for a few seconds or minutes, the pump should turn off again. Sometimes this auto switching process breaks! You don’t really want to find out that your pump didn’t turn on when it was needed most!
Many of you have sump pumps in your basement. We’re going to show you today, in more detail in video format, how to test yours, so that you can be confident it will turn on when you need it to!
Understanding the Parts of the Sump Pump
There’s a few things I want to mention before we actually look down in the sump pit, or basin. You probably have a lid. A lot of them kind of turn to unlock. So just get your lid off so you can see into the basin. Some of them screw down, and that’s okay. Just figure out how yours attaches and get that lid off of there.
Let’s look at some of the components of a sump pump. We’re going to look down in the basin later, as I mentioned, but the things you can see on top are a power cord and usually that just plugs into the wall, and a discharge pipe. Some go under the floor and then up the wall and out. Yours may not do that. Some of them come up and they’re on top of the floor, which is fine, but there’s going to be a discharge pipe somewhere.
You may have a black flex hose. If you do, that’s okay, but this is going to be a little less reliable, so just remember that. You want to check this for cracks, and replace this with solid PVC piping, at some point. If you do that, a good rule is to use 1 1/2″ piping size for most residential sump pumps.
In the video, I show a sump pump. It’s an old one. It’s obviously not the one that we’re going to work on here, but I use it to show you a couple things.
First is that if you have the black flex hose discharge, you’re probably going to have a connector that screws into the pump and then the hose goes on there with a hose clamp. If you have this type, then make sure that clamp is tight. A loose clamp can cause the flex hose to pop off and then no water will ever get pump out at all!
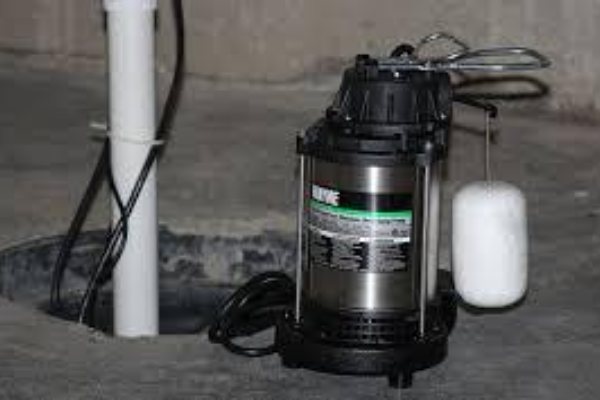
Second, is the switching method. We’ll cover the two most common options in this post. Some sump pumps use a floater with a switch inside of it that moves when you turn it up and down. If you listen carefully, you should be able to hear it click when you turn the switch upside down. So when the water fills up in your sump basin, the floater will start to float and it will kick it in the up direction and turn the sump pump on.
The other common switching method is a floater that is attached to an arm that connects to the switch on top of the pump. We’ll talk more about that type later.
Keeping the Sump Basin Clean
Another thing to be aware of is that sometimes your sump pump will get kind of cruddy and gross. Sometimes I find even bugs living down in there. A good solution for that is to use a liquid pool shocking chlorine. I usually just pour like a half a cup in there, or less, and then stir it a little. Now if your sump basin is dry, I probably wouldn’t pour it into a dry sump basin. Put some water in first, maybe a quarter of the way up, and then pour the pool shock into the water and stir it around a little bit. That will kill all the bugs and bacteria living down in there. That’s a good way to start.
Is the Discharge Obstructed Outside?
Let’s look outside now and find the pipe where our sump pump discharges. Take a look at where your pipe ends up. Is it buried in the grass? Is it being restricted in some way? Just make sure you’re getting good flow out of the discharge pipe on the outside of your house. I’ve seen many that are completely buried under ground. This will greatly reduce the effectiveness of your pump!
Basic Anatomy of a Sump Pump
Now we’re back down in the sump basin. We’re going to kind of look at the anatomy of the whole system. The large black bucket is called the sump basin. The most common type, as shown in the video above, has the tubes or the pipes that run around the perimeter of the basement drilled right through the side of the sump basin. When rain water collects underneath the floor or underneath the footing of the house, it migrates through the gravel bed that’s under the floor and into these pipes that have holes in them. Then the water runs through the pipes and dumps into the sump basin.
There’s another way that you might see this done as well. That’s with small holes drilled in the side of the sump basin all around making it perforated. Then gravel surrounds that sump basin. So when water collects in that gravel, it runs through those perforated areas in the side of the sump basin and just starts filling up that way. Either way, the basis is a low point in your basement where the water is going to collect. So the water collects in the basin and the sump pump sits down in the bottom. Out of the sump pump is a discharge pipe.
Most of the time you will see a check valve in the discharge pipe. A check valve is for one way flow of water. So when water flows up and the pump kicks off, all the water that’s developed upstream, in the head of the pipe, doesn’t run all the way back down and fill the sump basin back up. This kind of holds the water at that point. When more water fills up from the bottom, the pump will kick on and it will pump more water out through the check valve.
You might also see a slip coupling, which is just for taking your sump pump out and servicing it if you need to. You can loosen the clamps and remove the whole thing to repair or replace the sump pump. Now we’re getting to the other common type of on/off switch. That is switch arm with a little float on it. So when the water comes up, it floats up and it raises the arm and trips this switch. You can turn the sump pump on manually by rising the arm. That should kick the pump on and run the majority of the water out.
Test the Sump Pump
Now, this is what I want you all to do. I want you to try to trip your sump pump and get it started manually. Make sure that it’s running. We don’t want to find out when it’s raining or some early morning you come down to find two inches of water in your basement. You want to find out now if it’s working or not. If it runs, that tells us that the mechanics are working correctly, but what about the float. I’ve seen them become saturated and less buoyant.
I want you to check it another way by pouring water in there. Take a 5 gallon bucket of water and dump it in and see if the pump kicks on. If you pour the water in and the pump kicks on, your golden! Now you know you’re safe. Now you can feel a little more confident that next time it rains your sump pump is going to kick on, and you’re not going to be stuck with water in your basement. So get out there and check your sump pumps!
For more learning, our monthly checklists and our free eBook on being a more productive DIYer, visit www.AskHandymanBruce.com
I truly hope that these posts help you to make your home a more peaceful and enjoyable place for your family!
Don’t let the wood over your garage rot internally when you can do this one simple fix to prevent wood rot over wide openings, like a garage door!
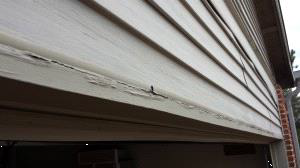
Here’s the Wood Rot Problem we can Prevent
Almost every house I look at has this scenario. Here we have a rotten trim board over a garage opening that doesn’t stand a chance. All the water that hits the siding above lands in the J channel and runs until it finds the seam. This is a recipe for disaster! You will never prevent wood rot this way. I’ve seen contractors try to caulk the J channel to prevent this, but vinyl expands and contracts way too much to depend on caulk. Look at this one!
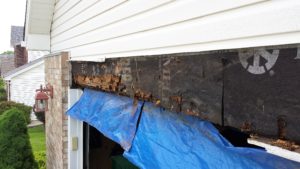
The Solution to Prevent Wood Rot
Let’s look at a more dependable solution to prevent wood rot…metal flashing! By adding a Z flashing, as it is commonly referred to, this rotting can effectively be prevented. The repair involves removing the siding above the trim board and installing the flashing against the sheathing. Nail it high to avoid penetrations low on the metal where the water will be. You can also set it in a bead of caulk to be sure that no water gets behind it.
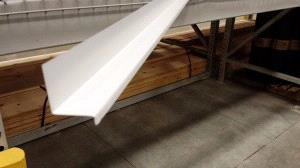
“Z” Flashing
You can bend your own if you have a metal brake or buy the pre-bent version shown here. I found this at our local home center. Bending your own, ensures that the horizontal distance between the two bends matches exactly to the horizontal protruding distance of you wood trim.
If you need to use more than one length over your trim board, then lap the seam and use a good urethane caulk to seal the joint. When the rain comes rolling down your siding now your wood will be protected from its greatest threat… water!
For more learning, our monthly checklists and our free eBook on being a more productive DIYer, visit www.AskHandymanBruce.com
I truly hope that these posts help you to make your home a more peaceful and enjoyable place for your family!