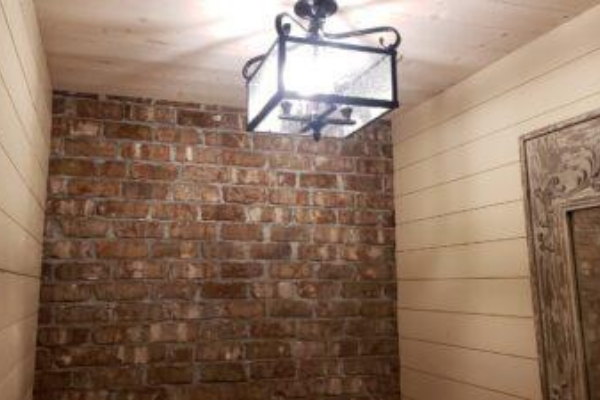
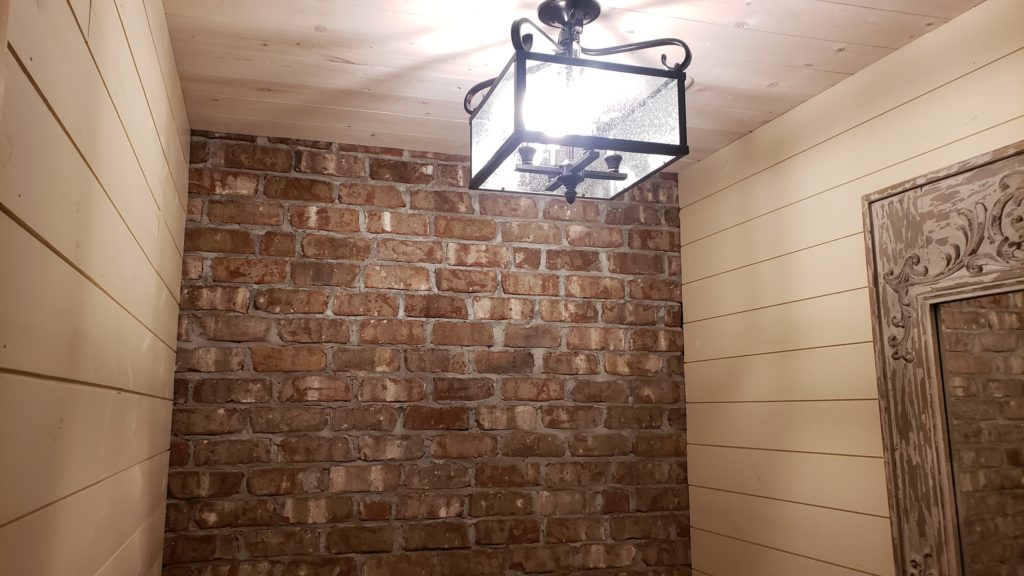
Today I am adding an interior brick accent wall. It’s not structural. It doesn’t have to withstand weather or anything. It’s just an interior brick accent wall. So, this wall is supposed to look like a brick wall that, maybe, used to have plaster on it or something and it got chiseled off and cleaned up for accent. You see that a lot. We’ve done that for a lot for customers in fact. So, now we’re laying this out from scratch in a newer house that’s made to look like an older house. We’ve got to know a few tips to make this look right. We’ve got to understand a little bit of the differences between this type of wall and a pointed exterior brick wall.
Video Version
For the full visual experience, watch the video version here. This video was a live session and the quality wasn’t very good, so I apologize in advance!
What we’re doing here is we’re scraping the joint with a trowel like this. We’re not pointing. If you did an exterior joint, you would need to make sure it’s smooth and sealed. More on that later…
Brick Selection
Since this is supposed to be an interior brick accent wall, the bricks I’ve chosen have a lot of bumps and chips. They kind of look like an old brick that might have been in a wall like this. You can also purchase used brick. They can be a little pricey, because someone has taken the time to clean the mortar of of them, or need lots of clean up work. These reasons are why I chose this brick that is new, but made to look weathered and older.
Let’s Get Started
Next we’re going lay up one of these rows. I’m going to lay the mortar for the bed joint (the horizontal joint under the new course) first. Now, this is not a “how to” on laying brick. I had a couple of uncles that were bricklayers and I got taught a lot of tips from them, but I am no expert bricklayer. So, don’t take all this as the absolute best process for laying bricks. But I know enough to play one on YouTube! 🙂
Let’s just see if we can get this joint in and talk a little bit more about how I’m doing this interior brick accent wall.
On this new course, we’re going to start with a full brick because I started with a half brick on the course below. Now, another thing that you see in these old brick walls, believe me I’ve seen a bunch of them, is you see the end of some bricks coming through that would have tied through to another course in their wall. Those old masonry walls, that we are trying to mimic, were three or four courses thick. Most of the time, 13 to 18 inches thick. Because of that, we’ve got a couple of those ends showing in our rows, too. That makes it look more authentic. Now, we’re going to go with a couple of regular courses next. I ended with a half brick so I’m going to start with a full brick. Then, we’re going to lay up the rest of the course.
The Mortar Joint
I’m going to get a little mortar and butter each joint on the end. After we do our bed joint, we’re still going to butter the end. Now, when we butter the joint, I’m just buttering these two directions because I want to leave this as full on the end as I can. Now, we press that in. We’re going to get good squish out on all three sides that way.
So, we butter that, take the next one and do the same thing. Butter both ways, then squish the brick into the last one. Now, we’re going to just keep repeating. And I’m setting them as I go. Again, this is not a tutorial on how to lay brick. If you were doing a wall, you’d probably lay your corners first and mark your joints on the sides. You would have a story pole here, and you’d mark where every brick course needs to be. At that point, you would lay up the sides of the wall first and set a stringline between and you would need to be right on that stringline. That’s the way you normally lay brick.
The Look of the Interior Brick Accent Wall
This is not the look we’re going for, here. We’re going for sort of a rough look. The brick layer that would have laid these walls up would have just gone through quickly. They would have been up and down. I mean, they wouldn’t have cared about too much irregularity in the courses. A little bit of ins and outs was fine. So, we’re kind of trying to duplicate that whole thing here.
Now, we need a piece of a brick on the edge. You take your brick hammer make a score where you want the brick to break. Do that on all the sides. And now, let’s see if we can get this to break right. It should break right along the scored line. Now, we’re going to lay that brick in the space.
Alright. So now, the difference here on these joints as to in a regular joint is like I’m telling you, you don’t want to run those joints too much with your trowel because it will look too finished. You want the look to be like the mortar was broken and chipped off flat with the plaster. So, now we’re going to take our level (I didn’t mean to indicate that you don’t use a level at all) and I am going to use a level to make sure I don’t get way off, but we’re just not being real fussy about it. So, I’m going to set all the bricks on this course and I’ll tap them down because I don’t want it to be way out. That wouldn’t look right.
Scraping the Brick Joints
Alright. That’s pretty decent there. Now, again, I’m going to show you. What we’re going to do is we’re just going to try to scrape off the excess mortar flush with the face of the brick. If you need to fill a particular area, then do so. Then come back and kind of scrape it which should give you that look that you want.
Alright. That’s about all you want to do. Now, what I’ve been doing is taking a soft bristled brush and I’ve been going over it afterwards. You just kind of knock off the rough spots. Just blend it just a little bit, not a lot. You should wait a few minutes before brushing. I just lay two or three courses, then brush the previous two or three. That give the mortar a few minutes to set up some.
Continue that process and make a cut at the top course, if needed. Here’s a picture of the finished product. I added my ceiling and walls up to the brick, so it would look authentic. That should do it for this project. Now you know one way to add an interior brick accent wall to your home!
For more learning, our monthly checklists and our free eBook on being a more productive DIYer, visitwww.AskHandymanBruce.com
I truly hope that these posts help you to make your home a more peaceful and enjoyable place for your family!
If you would rather watch a video than read, then just click the video. It has all the same stuff!
What are Sump Pumps
Sump pumps are electric water pumps that take collected water below the surface of a basement floor and send it out of the house, usually into the yard.
Most sump pumps are submersible, which means that they sit in a sump basin under water and automatically turn on when the water level reaches a certain height. After running for a few seconds or minutes, the pump should turn off again. Sometimes this auto switching process breaks! You don’t really want to find out that your pump didn’t turn on when it was needed most!
Many of you have sump pumps in your basement. We’re going to show you today, in more detail in video format, how to test yours, so that you can be confident it will turn on when you need it to!
Understanding the Parts of the Sump Pump
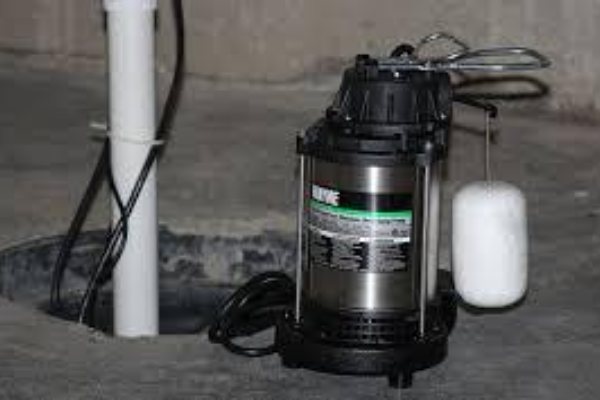
There’s a few things I want to mention before we actually look down in the sump pit, or basin. You probably have a lid. A lot of them kind of turn to unlock. So just get your lid off so you can see into the basin. Some of them screw down, and that’s okay. Just figure out how yours attaches and get that lid off of there.
Let’s look at some of the components of a sump pump. We’re going to look down in the basin later, as I mentioned, but the things you can see on top are a power cord and usually that just plugs into the wall, and a discharge pipe. Some go under the floor and then up the wall and out. Yours may not do that. Some of them come up and they’re on top of the floor, which is fine, but there’s going to be a discharge pipe somewhere.
You may have a black flex hose. If you do, that’s okay, but this is going to be a little less reliable, so just remember that. You want to check this for cracks, and replace this with solid PVC piping, at some point. If you do that, a good rule is to use 1 1/2″ piping size for most residential sump pumps.
In the video, I show a sump pump. It’s an old one. It’s obviously not the one that we’re going to work on here, but I use it to show you a couple things.
First is that if you have the black flex hose discharge, you’re probably going to have a connector that screws into the pump and then the hose goes on there with a hose clamp. If you have this type, then make sure that clamp is tight. A loose clamp can cause the flex hose to pop off and then no water will ever get pump out at all!
Second, is the switching method. We’ll cover the two most common options in this post. Some sump pumps use a floater with a switch inside of it that moves when you turn it up and down. If you listen carefully, you should be able to hear it click when you turn the switch upside down. So when the water fills up in your sump basin, the floater will start to float and it will kick it in the up direction and turn the sump pump on.
The other common switching method is a floater that is attached to an arm that connects to the switch on top of the pump. We’ll talk more about that type later.
Keeping the Sump Basin Clean
Another thing to be aware of is that sometimes your sump pump will get kind of cruddy and gross. Sometimes I find even bugs living down in there. A good solution for that is to use a liquid pool shocking chlorine. I usually just pour like a half a cup in there, or less, and then stir it a little. Now if your sump basin is dry, I probably wouldn’t pour it into a dry sump basin. Put some water in first, maybe a quarter of the way up, and then pour the pool shock into the water and stir it around a little bit. That will kill all the bugs and bacteria living down in there. That’s a good way to start.
Is the Discharge Obstructed Outside?
Let’s look outside now and find the pipe where our sump pump discharges. Take a look at where your pipe ends up. Is it buried in the grass? Is it being restricted in some way? Just make sure you’re getting good flow out of the discharge pipe on the outside of your house. I’ve seen many that are completely buried under ground. This will greatly reduce the effectiveness of your pump!
Basic Anatomy of a Sump Pump
Now we’re back down in the sump basin. We’re going to kind of look at the anatomy of the whole system. The large black bucket is called the sump basin. The most common type, as shown in the video above, has the tubes or the pipes that run around the perimeter of the basement drilled right through the side of the sump basin. When rain water collects underneath the floor or underneath the footing of the house, it migrates through the gravel bed that’s under the floor and into these pipes that have holes in them. Then the water runs through the pipes and dumps into the sump basin.
There’s another way that you might see this done as well. That’s with small holes drilled in the side of the sump basin all around making it perforated. Then gravel surrounds that sump basin. So when water collects in that gravel, it runs through those perforated areas in the side of the sump basin and just starts filling up that way. Either way, the basis is a low point in your basement where the water is going to collect. So the water collects in the basin and the sump pump sits down in the bottom. Out of the sump pump is a discharge pipe.
Most of the time you will see a check valve in the discharge pipe. A check valve is for one way flow of water. So when water flows up and the pump kicks off, all the water that’s developed upstream, in the head of the pipe, doesn’t run all the way back down and fill the sump basin back up. This kind of holds the water at that point. When more water fills up from the bottom, the pump will kick on and it will pump more water out through the check valve.
You might also see a slip coupling, which is just for taking your sump pump out and servicing it if you need to. You can loosen the clamps and remove the whole thing to repair or replace the sump pump. Now we’re getting to the other common type of on/off switch. That is switch arm with a little float on it. So when the water comes up, it floats up and it raises the arm and trips this switch. You can turn the sump pump on manually by rising the arm. That should kick the pump on and run the majority of the water out.
Test the Sump Pump
Now, this is what I want you all to do. I want you to try to trip your sump pump and get it started manually. Make sure that it’s running. We don’t want to find out when it’s raining or some early morning you come down to find two inches of water in your basement. You want to find out now if it’s working or not. If it runs, that tells us that the mechanics are working correctly, but what about the float. I’ve seen them become saturated and less buoyant.
I want you to check it another way by pouring water in there. Take a 5 gallon bucket of water and dump it in and see if the pump kicks on. If you pour the water in and the pump kicks on, your golden! Now you know you’re safe. Now you can feel a little more confident that next time it rains your sump pump is going to kick on, and you’re not going to be stuck with water in your basement. So get out there and check your sump pumps!
For more learning, our monthly checklists and our free eBook on being a more productive DIYer, visit www.AskHandymanBruce.com
I truly hope that these posts help you to make your home a more peaceful and enjoyable place for your family!
I’m talking to you today about how to use a metal brake to bend aluminum trim for the exterior of a house. You guys have probably seen trim like this, but may not be sure how it gets made. If you’re wondering how to do that or how that ever gets done, this will show you how!
Video showing how to bend aluminum trim
Cut the Metal to Width
What I’m going to do first is cut our piece to width. I’ve got the full 24 inch piece here. We’ll show you in a couple minutes how we actually rolled this out and a couple of tricks to roll it out and to cut the length.
I’ve marked on here three sections. They’re eight inches each, so I got 24 inches. I’m actually using all eight inches. You may use seven inches and then have a little bit of waste at the end or something. You can do it however you want, but I’ve marked this twice with eight inch marks.
I’ve got the first one put in the brake. Now I’m going to cut that. All we use is a utility knife with a sharp blade. We go along and score this a couple of times and it’ll brake right there.
Now we’ll take the handles, bend that up, come back a couple of times and you can see we’ve got a nice, straight edge on that. Now this is our scrap for our next piece.
Bending the Aluminum Trim to Specs
Now let’s go back to the brake and we’ll shape this to what we want. I want a right angle piece with a hem on one end. I’ll show you how to do a hem. I’m going to mark this first for our dimension. I want three quarters of an inch bent over as a finished top edge for our hem. I’m going to put our hem in first. This is white on both sides, so it doesn’t matter which side I choose. For you, you may be using metal that has a different color on the other side, so remember that you want to be on the right side when you put it in the brake.
All right now since this is going to be a hem, I want to go all the way as far as I can go with that. Now we’ll put it in the brake to flatten it down.
On the video, you can see that I have a hem there. That’s going to be the top finished edge of this metal. Now I’m going to bend a right angle coming out here, although I’m not going to bend it quite 90 degrees because I’m using this for some deck flashing and I want it to press down for me. I’m going to mark our dimension which is going to be four inches. We’ll put it back in the brake.
Again, I don’t want quite 90 degrees here. I’m going to let that be about 80, 85 degrees. Now that gives me the piece that we’re looking for. I hope that helps you guys understand a little bit more about bending aluminum trim metal. If you have questions, let me know in the comments and we can talk about it.
Tips for you today. This is called a hand brake. These come with different size blades or clamps. You can even get wider blades than this that’ll brake a little bit longer of a piece. Imagine you wanted to put a little bit of a bend on the end of your piece like this and maybe make a relief cut. I’m just making this up, so you probably wouldn’t cut it right there. For the purposes of demonstrating this I wanted to just make a relief cut. Let’s say you needed to bend a little 90 there, you can use your hand brake to do that to reshape some things. Additionally, sometimes you can use the hand brake to flatten your hem out. I got a couple areas that are still bulged up on my hem, so I can go along and kinda set my hem nice and tight with these. That’s a good use for those tools. A hand brake. Nice tool to add.
Okay, here’s another tip for you. When you’re rolling out your metal, I always clamp it like this because if you don’t it’ll uncoil on you and you’ll have a big mess. I clamp it then kinda hang onto it with my hands and roll it out. I’ve got a little stick down here. My brake is 10 feet long, so I’m gonna roll out a nine and a half foot piece. Actually, the brake’s a little over 10. You could … I could do a full 10 but I don’t need it for what I’m doing so I’m going nine and a half. Again, just kinda be careful to hang on to your roll. Once you get to where you wanna be, put your clamps back on. Take your snips. I’m just using some snips like this and I cut it right at nine and a half. We’re all set. Ready to mark it and go back in the brake with it.
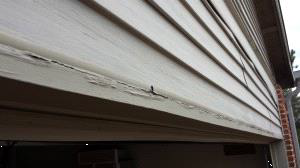
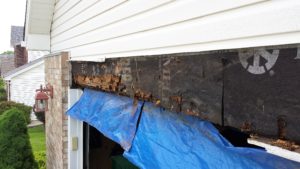
Don’t let the wood over your garage rot internally when you can do this one simple fix to prevent wood rot over wide openings, like a garage door!
Here’s the Wood Rot Problem we can Prevent
Almost every house I look at has this scenario. Here we have a rotten trim board over a garage opening that doesn’t stand a chance. All the water that hits the siding above lands in the J channel and runs until it finds the seam. This is a recipe for disaster! You will never prevent wood rot this way. I’ve seen contractors try to caulk the J channel to prevent this, but vinyl expands and contracts way too much to depend on caulk. Look at this one!
The Solution to Prevent Wood Rot
Let’s look at a more dependable solution to prevent wood rot…metal flashing! By adding a Z flashing, as it is commonly referred to, this rotting can effectively be prevented. The repair involves removing the siding above the trim board and installing the flashing against the sheathing. Nail it high to avoid penetrations low on the metal where the water will be. You can also set it in a bead of caulk to be sure that no water gets behind it.
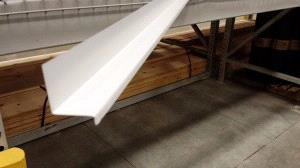
“Z” Flashing
You can bend your own if you have a metal brake or buy the pre-bent version shown here. I found this at our local home center. Bending your own, ensures that the horizontal distance between the two bends matches exactly to the horizontal protruding distance of you wood trim.
If you need to use more than one length over your trim board, then lap the seam and use a good urethane caulk to seal the joint. When the rain comes rolling down your siding now your wood will be protected from its greatest threat… water!
For more learning, our monthly checklists and our free eBook on being a more productive DIYer, visit www.AskHandymanBruce.com
I truly hope that these posts help you to make your home a more peaceful and enjoyable place for your family!
All right. Today, we’re going to talk about a gas barbecue pit. This barbecue pit here came as a propane, and we’re converting it to natural gas and hooking it up for you. We’re going to show you how all that works. We’re going to give you an intro into how that works. So you get a little more insight into what the steps are involved, and if you want more information let me know, and we could do a more in-depth blog post or video on that sometime.
The first thing we did was we ordered a conversion kit for this barbecue pit. Now this is a charbroil. I want you to know too that we did find out that all barbecue kits are not convertible. Keep that in mind too, you want to check that out ahead of time. But we bought a conversion kit that has this hose over here. We’ve taken our gas line, we rerouted it over here. You can see that’s got copper silver soldered together with the safety shutoff there. You always want to have that safety shutoff ideally so if anything happens, you can go over there and shut that gas off right away.
So, we’ve done all that. Now, what I wanted to show you guys today, get a little tip to you for, is how to deal with the orifices. Now the orifices are different for natural gas than they are for propane. This is an orifice wrench, and these are the orifices right here. I’m going to show it to you. See that right there in my hand. That screws in there. You can see it’s got a little hole in there that the gas comes out. What we’ve done is we’ve got the right sized orifices for our barbecue pit, now I’m going to show you how to put those in.
All right, I’ve put the orifice in the wrench, and we’re going to go back in here. I don’t know if you’ll be able to see all this or not, but inside here where the burner came out, there’s a little hole. We’re going to stick it in there. We’re going to screw that into that receiving threaded fitting.
Okay, we’ve got it tightened into there, so now I’m going to insert the burners. Put them back. Now this is a, like I said, it’s a charbroiled, they’re not all the same, so yours might go in a little differently. But you insert it over the orifice, and then fit it down onto there. This one has little clips that go in the back, back here, that hold it in place. All right, so we’re going to lay everything back in, and then we’ll show you how it all works.
All right, we’ve got everything put back together, now we’re going to light it. Okay, it is lit. It’s going to be hard to see with the sun shining here, but let’s see if we can close it. There you can see the flame. So, what I’m doing here is I’m looking at the flame quality. That’s on high. Now let’s change that down to low. Now you can see we’ve got a lower flame. I think we’re looking pretty good there.
There’s an adjustment on these where you can turn this little jet here that will allow more or less air to mix with it. If you open that, it’ll kind of play with the flame. Again, with the sun shining, it’s hard to see, but if you do this at night, in the evening when it’s dark, or your kind of close the lid down, look at it, you can see what you need for your flame adjustment. I’ve done that for each one.
I’m going to say we’re going to light those. Now we should have them all lit. See if you can see that. Yeah, looks like they’re all going pretty well here. I’ve checked them all on low as well, so they’re working fine. That’s going to be a wrap on that. We’re going to put the grills back in, and ready for some hamburgers.