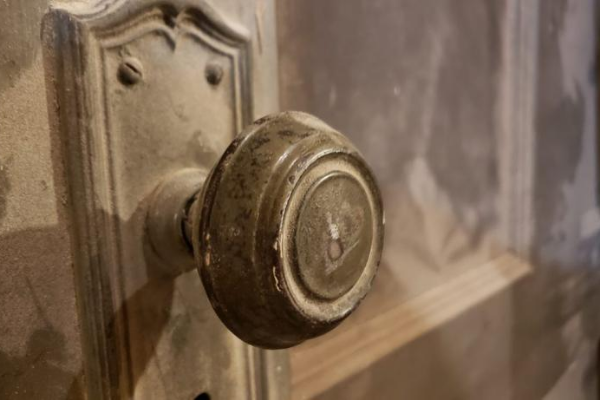
I really love the character of older homes, but they can present challenges when trying to make even basic repairs. Take doorknobs for example. Most older homes have a very small hole in each door for a square threaded shaft, which has a doorknob on each end. Those knobs are usually secured with set screws. While these are quite dependable and well made, the time can come to replace them. You can go the authentic route and purchase restoration equipment, but prepare to pay a hefty price! Most of you will want to follow a little more economic path. Here’s how to install a modern door knob in old doors.
1. Make a jig
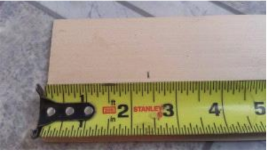
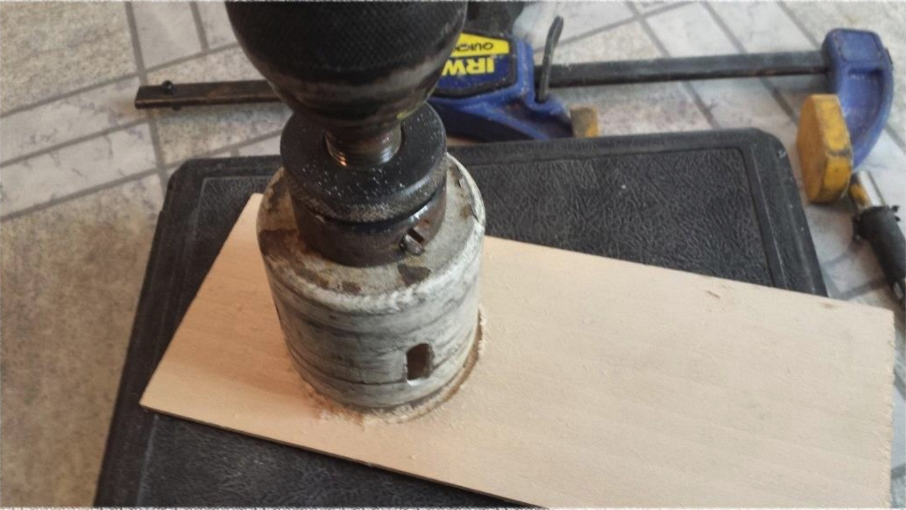
Select a small piece of plywood that you can use as a guide jig for drilling out the door. Check the backset distance of the new doorknob that you want to install (most the time the distance will be 2 3/8′′) and mark it on the jig off of one end of the board. Use your hole saw to drill out the jig with same size hole that will be needed for the doorknob (usually 2 1/8′′). Drill out the jig, centering on the mark.
2. Drill out the door
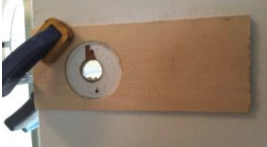
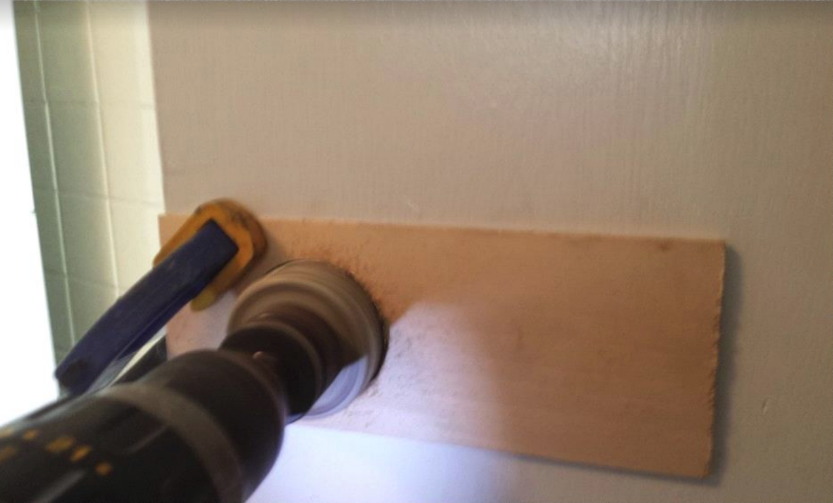
Clamp the jig on the door while making sure that the reference edge, the one that you measured from in step 1, is lined up with the edge of the door. Clamp the jig in place. Now use the same hole saw and drill out the door while using the jig to keep the drill from “walking” on the door. Use caution when drilling through the other side of the door to keep the door from splintering out on the other side. You can put a second piece of plywood on the other side to “back the door” during drilling to avoid blowout.
Clamp the jig to the door with the reference edge lined up on the edge of the door.
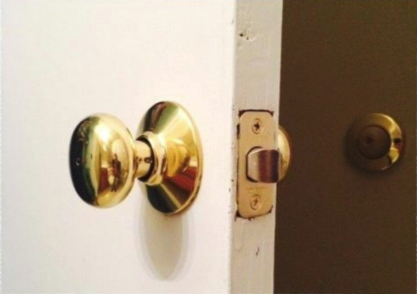
3. Install new door knob
Now you are ready to install the new doorknob as you would with any newer type door.
I hope this helps answer your questions about how to install new door knobs in old doors. I encourage you to use the home repair knowledge that you have to make your home a great place for your family!
Please comment below on how you have used this tip or others to help make your home better.
For more learning, our monthly checklists and our free eBook on being a more productive DIYer, visit www.AskHandymanBruce.com
I truly hope that these posts help you to make your home a more peaceful and enjoyable place for your family!
Second or third floor bathrooms are great, but if there is a leak in the shower, it’s hard to know where to start! There are many possible places that a tub or shower can leak water. If you have a leaking shower, then don’t proceed with your repairs until you know these ways to diagnose common problems. Step #1 Test to see if the problem occurs when just the shower runs or does it also appear when water runs from the tub spout (if you just have a shower without a tub, then you will need to modify these procedures slightly). Water running from tub spout Run lots of water out of the tub spout and monitor the wet area. You may have to let it dry up before you can really see if new water is appearing. If the leak is on a drywall ceiling below, then consider cutting a small inspection hole to help evaluate your test results. If you still find water below, then proceed to step #2. If you see no water from this test, then that means that the leak is either in the riser pipe that runs from the valve to the shower head inside the wall OR from water that is splashing inside the shower and finding a way through the surfaces in the shower. The Bucket Test To further narrow down these two options to one, examine the water flow carefully while the shower is running. Does it clearly spray out of the shower head or is there water streaming back to the wall? If water is running against one of the walls, then correct the problem. If you don’t think this is the case then have a helper hold a large bucket under the shower-head while testing again. View inside wall Run the shower this way for 2 or 3 minutes (or for longer if it normally takes longer for the leak to show up) dumping the bucket in the toilet or sink, as needed. Most likely this will prove to keep the leak from showing up because leaks in the pipe behind the wall are very uncommon. If your leak has been kept away by this, then the problem is not inside the wall. You most likely have a problem with a seal in the surfaces of your shower. Caulking and sealing are in order. If, after the bucket test, you’re still getting leaking water below, then you most likely have a problem with the plumbing inside the wall. Find a place to get access and cut a work hole to make the repair. If either of these two results has revealed the problem. No need to go to step two. Just get to work! Step #2 Next let’s do another test. Stop the drain and fill your bathtub with water. Make sure that the drain is holding water and not seeping through. Fill tub with water You can usually hear the water seeping if you turn off the water and listen carefully. Let the water stand in the tub for several hours and see if the leak is present. If so, then the problem is on the top side of the tub where the drain assembly is supposed to seal to the tub. The solution is to unscrew the drain assembly and reseal it with plumbers putty (or clear silicone if you have a cultured marble tub). You have found your problem! If your test results in no water, until you un-stop the drain that is, then you can proceed to step #3! Step #3 Now let’s look further down. We have isolated the problem to below the tub surface. Cross section of tub drain In the image above you will see the bath drain shoe. On the bottom of the tub is a thick rubber seal that is pulled tightly up against the bottom of the tub by the drain shoe to keep water that goes down the drain from leaving the constraints of the pipe. This is your next most likely spot to have a problem. This seal can dry up and crack over time and lose its ability to seal. This can be replaced from the top by removing the drain assembly and slipping a new one through the drain hole and resting it under the tub. Reinstall the drain assembly with plumber’s putty or clear silicone. In cases where the bottom of the tub is visible, simply look at the connections on all the pipes while water is running through them and determine where the leak is. It’s not so easy when the ceiling below hides all this from your view. In many cases the best way to diagnose and repair it at this point is to cut out a work hole below and patch it after the repair is complete. Step #4 If you pass all these tests and still have a leak when the water is running, then you probably have a damaged place in a pipe. Carefully cut into the ceiling or wall to expose the problem area At this point you can start cutting into the ceiling or walls to find the leak knowing that you did everything you could to eliminate the simpler solutions. Always be careful when cutting into a wall. Proceed slowly with a hand saw to avoid damaging a pipe or wire. It can cause serious injury, if proper care is not taken. So let’s review: Step #1 Test to see if the problem occurs when just the shower runs. Step #2 Next let’s do another test. Stop the drain and fill your bathtub with water. Step #3 Now let’s look further down. The bottom seal can dry up and crack over time and lose its ability to seal under the tub. Step #4 If you pass all these tests and still have a leak when the water is running, then you probably have a damaged place in a pipe. I hope that this helps you when diagnosing a drain leak in your tub or shower. For more learning, our monthly checklists and our free eBook on being a more productive DIYer, visit www.AskHandymanBruce.com I truly hope that these posts help you to make your home a more peaceful and enjoyable place for your family! Handyman Bruce www.HouseRepairsYourself.com “Bringing your family home!”
There are several areas on a roof that can cause water problems, but this the most common problem that I find: Damage to the flashing around plumbing vent pipes! Learn how to avoid water damage to your home. There are two main types of pipe flashings.
Lead Pipe Flashing that won’t Avoid Water Damage
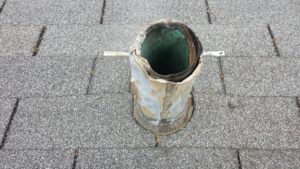
Chewed lead roof flashing
Here is a lead flashing that has been chewed on by squirrel, most likely. This will not help you avoid water damage to your home!
This type of flashing is normally used around a cast iron plumbing vent. The lead should surround the pipe and the extra should fold over the top of the pipe, toward the inside. That causes the rain water to run on the outside of the flashing or in the pipe, which are both fine. The problem that has been caused by the squirrel chewing the top of the lead is that now water can get between the pipe and the flashing. This allows the water to go right into your attic! Best case scenario is that it causes a stain on your ceiling. At the worst, it will cause ceiling and framing damage or mold to grow in your attic!
Neoprene Pipe Flashing that won’t Avoid Water Damage
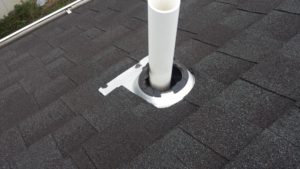
Another type of pipe flashing is the neoprene flashing. This type is most commonly used over a PVC plumbing vent. This type is made to snugly slide over the PVC pipe and create a seal near the roof line. The rain water, in this case, can run on the inside of the pipe or on the outside, but when it hits the neoprene seal, it runs over the flashing and down the roof.
Brittle and damaged neoprene roof flashing
Look at this failing seal. You need to learn to spot problems here if you want to avoid water damage to your home. The neoprene has gotten brittle and cracked. This one is very advanced and has been leaking for months, I’m sure! Usually, I find them with a small crack in the neoprene that just lets a small amount of rain water through.
In either case, doing a quick annual inspection of the roof will allow you to catch this problem before it becomes a big problem! Above all, if you’re a DIY homeowner, you should know what to assess each month on your home to protect your asset and keep your home serving your family well.
For our monthly checklists and our free eBook on being a more productive DIYer, visit www.AskHandymanBruce.com
I truly hope that these posts help you to make your home a more peaceful and enjoyable place for your family!
Okay, first we’re gonna take a diamond wheel and a grinder, and maybe a shop vac to control dust, and we’re gonna grind out the shape of the electrical box. Then, we’re gonna cut a pathway down the wall and chisel out the remaining material to allow a nice chase for the wire to run.
Next, we’re gonna drill around the perimeter of the box with a masonry drill to try to remove more of the material. The rest of it can be chiseled out with a masonry chisel.
Next, we’re gonna drill from our pathway for the wire into the box chamber so that our wire can fit nicely in place. Yours might be slightly different, but you get the idea.
Now once everything fits into place, we can seat the box into the wall with some expanding spray foam. Now what I’ve done ahead of time is cut a prop stick for it so that once I spray it, I can prop it in place and let it dry overnight so that it sits nice and tight. In our case, we ran Romex down the wall, but in some local areas you need to use shielded cable like MC wire or something, but you get the idea there too.
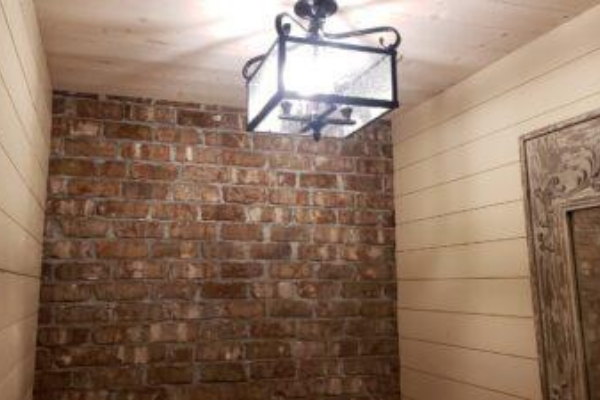
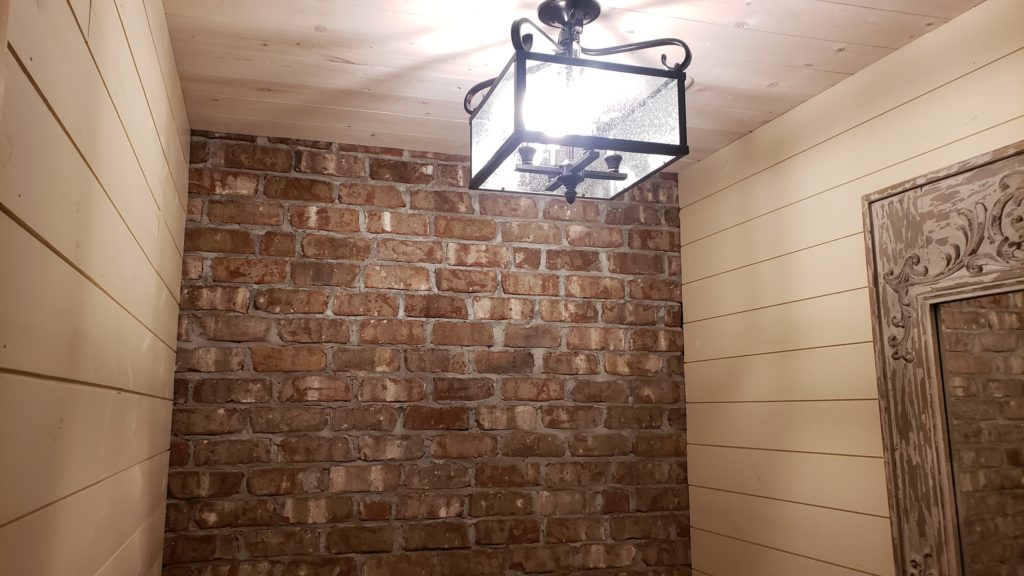
Today I am adding an interior brick accent wall. It’s not structural. It doesn’t have to withstand weather or anything. It’s just an interior brick accent wall. So, this wall is supposed to look like a brick wall that, maybe, used to have plaster on it or something and it got chiseled off and cleaned up for accent. You see that a lot. We’ve done that for a lot for customers in fact. So, now we’re laying this out from scratch in a newer house that’s made to look like an older house. We’ve got to know a few tips to make this look right. We’ve got to understand a little bit of the differences between this type of wall and a pointed exterior brick wall.
Video Version
For the full visual experience, watch the video version here. This video was a live session and the quality wasn’t very good, so I apologize in advance!
What we’re doing here is we’re scraping the joint with a trowel like this. We’re not pointing. If you did an exterior joint, you would need to make sure it’s smooth and sealed. More on that later…
Brick Selection
Since this is supposed to be an interior brick accent wall, the bricks I’ve chosen have a lot of bumps and chips. They kind of look like an old brick that might have been in a wall like this. You can also purchase used brick. They can be a little pricey, because someone has taken the time to clean the mortar of of them, or need lots of clean up work. These reasons are why I chose this brick that is new, but made to look weathered and older.
Let’s Get Started
Next we’re going lay up one of these rows. I’m going to lay the mortar for the bed joint (the horizontal joint under the new course) first. Now, this is not a “how to” on laying brick. I had a couple of uncles that were bricklayers and I got taught a lot of tips from them, but I am no expert bricklayer. So, don’t take all this as the absolute best process for laying bricks. But I know enough to play one on YouTube! 🙂
Let’s just see if we can get this joint in and talk a little bit more about how I’m doing this interior brick accent wall.
On this new course, we’re going to start with a full brick because I started with a half brick on the course below. Now, another thing that you see in these old brick walls, believe me I’ve seen a bunch of them, is you see the end of some bricks coming through that would have tied through to another course in their wall. Those old masonry walls, that we are trying to mimic, were three or four courses thick. Most of the time, 13 to 18 inches thick. Because of that, we’ve got a couple of those ends showing in our rows, too. That makes it look more authentic. Now, we’re going to go with a couple of regular courses next. I ended with a half brick so I’m going to start with a full brick. Then, we’re going to lay up the rest of the course.
The Mortar Joint
I’m going to get a little mortar and butter each joint on the end. After we do our bed joint, we’re still going to butter the end. Now, when we butter the joint, I’m just buttering these two directions because I want to leave this as full on the end as I can. Now, we press that in. We’re going to get good squish out on all three sides that way.
So, we butter that, take the next one and do the same thing. Butter both ways, then squish the brick into the last one. Now, we’re going to just keep repeating. And I’m setting them as I go. Again, this is not a tutorial on how to lay brick. If you were doing a wall, you’d probably lay your corners first and mark your joints on the sides. You would have a story pole here, and you’d mark where every brick course needs to be. At that point, you would lay up the sides of the wall first and set a stringline between and you would need to be right on that stringline. That’s the way you normally lay brick.
The Look of the Interior Brick Accent Wall
This is not the look we’re going for, here. We’re going for sort of a rough look. The brick layer that would have laid these walls up would have just gone through quickly. They would have been up and down. I mean, they wouldn’t have cared about too much irregularity in the courses. A little bit of ins and outs was fine. So, we’re kind of trying to duplicate that whole thing here.
Now, we need a piece of a brick on the edge. You take your brick hammer make a score where you want the brick to break. Do that on all the sides. And now, let’s see if we can get this to break right. It should break right along the scored line. Now, we’re going to lay that brick in the space.
Alright. So now, the difference here on these joints as to in a regular joint is like I’m telling you, you don’t want to run those joints too much with your trowel because it will look too finished. You want the look to be like the mortar was broken and chipped off flat with the plaster. So, now we’re going to take our level (I didn’t mean to indicate that you don’t use a level at all) and I am going to use a level to make sure I don’t get way off, but we’re just not being real fussy about it. So, I’m going to set all the bricks on this course and I’ll tap them down because I don’t want it to be way out. That wouldn’t look right.
Scraping the Brick Joints
Alright. That’s pretty decent there. Now, again, I’m going to show you. What we’re going to do is we’re just going to try to scrape off the excess mortar flush with the face of the brick. If you need to fill a particular area, then do so. Then come back and kind of scrape it which should give you that look that you want.
Alright. That’s about all you want to do. Now, what I’ve been doing is taking a soft bristled brush and I’ve been going over it afterwards. You just kind of knock off the rough spots. Just blend it just a little bit, not a lot. You should wait a few minutes before brushing. I just lay two or three courses, then brush the previous two or three. That give the mortar a few minutes to set up some.
Continue that process and make a cut at the top course, if needed. Here’s a picture of the finished product. I added my ceiling and walls up to the brick, so it would look authentic. That should do it for this project. Now you know one way to add an interior brick accent wall to your home!
For more learning, our monthly checklists and our free eBook on being a more productive DIYer, visitwww.AskHandymanBruce.com
I truly hope that these posts help you to make your home a more peaceful and enjoyable place for your family!
If you would rather watch a video than read, then just click the video. It has all the same stuff!
What are Sump Pumps
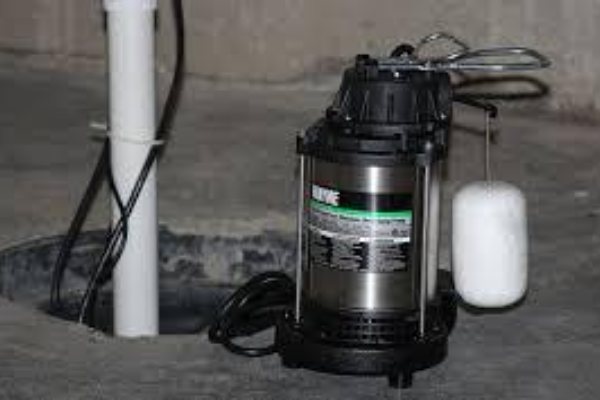
Sump pumps are electric water pumps that take collected water below the surface of a basement floor and send it out of the house, usually into the yard.
Most sump pumps are submersible, which means that they sit in a sump basin under water and automatically turn on when the water level reaches a certain height. After running for a few seconds or minutes, the pump should turn off again. Sometimes this auto switching process breaks! You don’t really want to find out that your pump didn’t turn on when it was needed most!
Many of you have sump pumps in your basement. We’re going to show you today, in more detail in video format, how to test yours, so that you can be confident it will turn on when you need it to!
Understanding the Parts of the Sump Pump
There’s a few things I want to mention before we actually look down in the sump pit, or basin. You probably have a lid. A lot of them kind of turn to unlock. So just get your lid off so you can see into the basin. Some of them screw down, and that’s okay. Just figure out how yours attaches and get that lid off of there.
Let’s look at some of the components of a sump pump. We’re going to look down in the basin later, as I mentioned, but the things you can see on top are a power cord and usually that just plugs into the wall, and a discharge pipe. Some go under the floor and then up the wall and out. Yours may not do that. Some of them come up and they’re on top of the floor, which is fine, but there’s going to be a discharge pipe somewhere.
You may have a black flex hose. If you do, that’s okay, but this is going to be a little less reliable, so just remember that. You want to check this for cracks, and replace this with solid PVC piping, at some point. If you do that, a good rule is to use 1 1/2″ piping size for most residential sump pumps.
In the video, I show a sump pump. It’s an old one. It’s obviously not the one that we’re going to work on here, but I use it to show you a couple things.
First is that if you have the black flex hose discharge, you’re probably going to have a connector that screws into the pump and then the hose goes on there with a hose clamp. If you have this type, then make sure that clamp is tight. A loose clamp can cause the flex hose to pop off and then no water will ever get pump out at all!
Second, is the switching method. We’ll cover the two most common options in this post. Some sump pumps use a floater with a switch inside of it that moves when you turn it up and down. If you listen carefully, you should be able to hear it click when you turn the switch upside down. So when the water fills up in your sump basin, the floater will start to float and it will kick it in the up direction and turn the sump pump on.
The other common switching method is a floater that is attached to an arm that connects to the switch on top of the pump. We’ll talk more about that type later.
Keeping the Sump Basin Clean
Another thing to be aware of is that sometimes your sump pump will get kind of cruddy and gross. Sometimes I find even bugs living down in there. A good solution for that is to use a liquid pool shocking chlorine. I usually just pour like a half a cup in there, or less, and then stir it a little. Now if your sump basin is dry, I probably wouldn’t pour it into a dry sump basin. Put some water in first, maybe a quarter of the way up, and then pour the pool shock into the water and stir it around a little bit. That will kill all the bugs and bacteria living down in there. That’s a good way to start.
Is the Discharge Obstructed Outside?
Let’s look outside now and find the pipe where our sump pump discharges. Take a look at where your pipe ends up. Is it buried in the grass? Is it being restricted in some way? Just make sure you’re getting good flow out of the discharge pipe on the outside of your house. I’ve seen many that are completely buried under ground. This will greatly reduce the effectiveness of your pump!
Basic Anatomy of a Sump Pump
Now we’re back down in the sump basin. We’re going to kind of look at the anatomy of the whole system. The large black bucket is called the sump basin. The most common type, as shown in the video above, has the tubes or the pipes that run around the perimeter of the basement drilled right through the side of the sump basin. When rain water collects underneath the floor or underneath the footing of the house, it migrates through the gravel bed that’s under the floor and into these pipes that have holes in them. Then the water runs through the pipes and dumps into the sump basin.
There’s another way that you might see this done as well. That’s with small holes drilled in the side of the sump basin all around making it perforated. Then gravel surrounds that sump basin. So when water collects in that gravel, it runs through those perforated areas in the side of the sump basin and just starts filling up that way. Either way, the basis is a low point in your basement where the water is going to collect. So the water collects in the basin and the sump pump sits down in the bottom. Out of the sump pump is a discharge pipe.
Most of the time you will see a check valve in the discharge pipe. A check valve is for one way flow of water. So when water flows up and the pump kicks off, all the water that’s developed upstream, in the head of the pipe, doesn’t run all the way back down and fill the sump basin back up. This kind of holds the water at that point. When more water fills up from the bottom, the pump will kick on and it will pump more water out through the check valve.
You might also see a slip coupling, which is just for taking your sump pump out and servicing it if you need to. You can loosen the clamps and remove the whole thing to repair or replace the sump pump. Now we’re getting to the other common type of on/off switch. That is switch arm with a little float on it. So when the water comes up, it floats up and it raises the arm and trips this switch. You can turn the sump pump on manually by rising the arm. That should kick the pump on and run the majority of the water out.
Test the Sump Pump
Now, this is what I want you all to do. I want you to try to trip your sump pump and get it started manually. Make sure that it’s running. We don’t want to find out when it’s raining or some early morning you come down to find two inches of water in your basement. You want to find out now if it’s working or not. If it runs, that tells us that the mechanics are working correctly, but what about the float. I’ve seen them become saturated and less buoyant.
I want you to check it another way by pouring water in there. Take a 5 gallon bucket of water and dump it in and see if the pump kicks on. If you pour the water in and the pump kicks on, your golden! Now you know you’re safe. Now you can feel a little more confident that next time it rains your sump pump is going to kick on, and you’re not going to be stuck with water in your basement. So get out there and check your sump pumps!
For more learning, our monthly checklists and our free eBook on being a more productive DIYer, visit www.AskHandymanBruce.com
I truly hope that these posts help you to make your home a more peaceful and enjoyable place for your family!

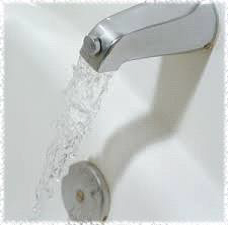 Water running from tub spout Run lots of water out of the tub spout and monitor the wet area. You may have to let it dry up before you can really see if new water is appearing. If the leak is on a drywall ceiling below, then consider cutting a small inspection hole to help evaluate your test results. If you still find water below, then proceed to step #2. If you see no water from this test, then that means that the leak is either in the riser pipe that runs from the valve to the shower head inside the wall OR from water that is splashing inside the shower and finding a way through the surfaces in the shower. The Bucket Test To further narrow down these two options to one, examine the water flow carefully while the shower is running. Does it clearly spray out of the shower head or is there water streaming back to the wall? If water is running against one of the walls, then correct the problem. If you don’t think this is the case then have a helper hold a large bucket under the shower-head while testing again.
 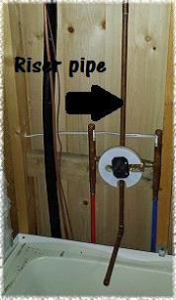 View inside wall Run the shower this way for 2 or 3 minutes (or for longer if it normally takes longer for the leak to show up) dumping the bucket in the toilet or sink, as needed. Most likely this will prove to keep the leak from showing up because leaks in the pipe behind the wall are very uncommon. If your leak has been kept away by this, then the problem is not inside the wall. You most likely have a problem with a seal in the surfaces of your shower. Caulking and sealing are in order. If, after the bucket test, you’re still getting leaking water below, then you most likely have a problem with the plumbing inside the wall. Find a place to get access and cut a work hole to make the repair. If either of these two results has revealed the problem. No need to go to step two. Just get to work! Step #2 Next let’s do another test. Stop the drain and fill your bathtub with water. Make sure that the drain is holding water and not seeping through.
 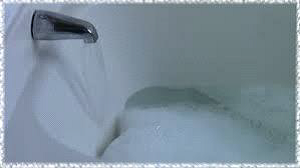 Fill tub with water You can usually hear the water seeping if you turn off the water and listen carefully. Let the water stand in the tub for several hours and see if the leak is present. If so, then the problem is on the top side of the tub where the drain assembly is supposed to seal to the tub. The solution is to unscrew the drain assembly and reseal it with plumbers putty (or clear silicone if you have a cultured marble tub). You have found your problem! If your test results in no water, until you un-stop the drain that is, then you can proceed to step #3! Step #3 Now let’s look further down. We have isolated the problem to below the tub surface.
 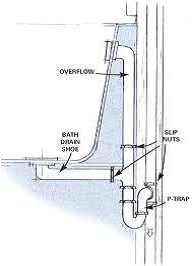 Cross section of tub drain In the image above you will see the bath drain shoe. On the bottom of the tub is a thick rubber seal that is pulled tightly up against the bottom of the tub by the drain shoe to keep water that goes down the drain from leaving the constraints of the pipe. This is your next most likely spot to have a problem. This seal can dry up and crack over time and lose its ability to seal. This can be replaced from the top by removing the drain assembly and slipping a new one through the drain hole and resting it under the tub. Reinstall the drain assembly with plumber’s putty or clear silicone. In cases where the bottom of the tub is visible, simply look at the connections on all the pipes while water is running through them and determine where the leak is. It’s not so easy when the ceiling below hides all this from your view. In many cases the best way to diagnose and repair it at this point is to cut out a work hole below and patch it after the repair is complete. Step #4 If you pass all these tests and still have a leak when the water is running, then you probably have a damaged place in a pipe.
 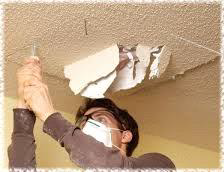 Carefully cut into the ceiling or wall to expose the problem area At this point you can start cutting into the ceiling or walls to find the leak knowing that you did everything you could to eliminate the simpler solutions. Always be careful when cutting into a wall. Proceed slowly with a hand saw to avoid damaging a pipe or wire. It can cause serious injury, if proper care is not taken. So let’s review: Step #1 Test to see if the problem occurs when just the shower runs. Step #2 Next let’s do another test. Stop the drain and fill your bathtub with water. Step #3 Now let’s look further down. The bottom seal can dry up and crack over time and lose its ability to seal under the tub. Step #4 If you pass all these tests and still have a leak when the water is running, then you probably have a damaged place in a pipe. I hope that this helps you when diagnosing a drain leak in your tub or shower. For more learning, our monthly checklists and our free eBook on being a more productive DIYer, visit
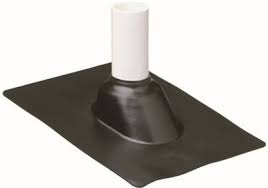 This type is most commonly used over a PVC plumbing vent. This type is made to snugly slide over the PVC pipe and create a seal near the roof line. The rain water, in this case, can run on the inside of the pipe or on the outside, but when it hits the neoprene seal, it runs over the flashing and down the roof.