To discuss how to organize and plan home repair, I would like to tell you a short story. A friend of mine (Mike, you know who you are!) told me recently that, “if I was organized, I would be dangerous.” We commented back and forth for a bit about some related character traits, but for some reason this familiar phrase stuck with me this time. How important is it to be organized, I thought. I can focus broadly on lots of things at once and still be effective, right?
Multi-task or not?
The truth is that I really can’t! Being organized and knowing what the tasks are and taking them one at a time in an intentional way is essential to being effective and victorious in any area of life. Getting organized and planned about your home repair is no exception.
With planning, what separates the leaders from the followers? It’s the ability to assess and plan for success and then work the plan to completion. I can hear you saying right now, “Yeah, I’ve heard this before. I plan everything.” My question to you is, do you?
Plan Everything!
How many of us have pulled the towel rack off its mount with the towel in the morning and said, “I’ve got fix that!”, only to be back in the same place the next morning. Or, if you’re a guy, have you ever found that your wife is discouraged by the failing appliance that has been broken for 6 months, but only seems like 6 days to you? Or if you’re a homemaker, has your family wanted to host a party or gathering for a while now, but just need to get the house in shape first?
To use my friend Mike’s term, I propose that “we would be Dangerous if we would just organize our home repair”!
How to Get Started
Why do we plan our child care, physical care, pet care, emotional care, and lawn care, but don’t plan our home care? I would like to change that. This year, I urge you to set aside planned time each month to evaluate and make repairs on your home. Some good questions to ask could be:
1. Do I know what to look for around my house to find problems that may exist?
2. Do I have a place to document the needed repairs that I find?
3. Do I have them prioritized in order of importance?
4. Do I have a plan to get them completed?
5. What would it take to work my home repair plan?
Could you spare one Saturday morning a month to get started? Identify all the items that you are aware of that need your home repair attention. Put them in one place and prioritize them. You might consider setting up a Trello account and making a board just for To Do items around the house. Make categories that make sense to you and prioritize within those categories. The account at Trello.com is free!
Unknown Repair Needs
Another point to consider is the repair needs that are not known. For example, another friend of mine, Ron, called me one early Sunday morning and said that he found 3″ of water in his entire basement and wondered if I had any advice on where to go next. I went over there to help him dry everything up and discovered that his sump pump was seized up and it was not running! The water problem was a result of one of the first heavy spring rains and frankly his entire lower level depended on that sump pump kicking on when it was needed, but it didn’t! This was an unknown repair that was needed. How do we plan to avoid these types of home repair disasters?
It is called monthly assessment.
A simple manual test of his sump pump at the right time of year would have revealed the ineffective culprit! Consider studying up on what components of your home need to be checked or assessed and when. By trial and error, you can come up with a pretty good list. Another option is to take advantage of subscription products that are available to you. By subscribing to our membership group on Facebook, you not only get the regular monthly assessment list of what to assess and when, but also tips and training from a pro! This is very inexpensive and, as my friend Ron will tell you, it will save you money in the long run!
Proactive Home Repair Community
Go to this link to learn more about our special group for those wanting to learn more in the year ahead about getting their home repair organized!
So as we all look to improve and grow in the new year ahead, I strongly recommend putting your home repair back on your radar. After all our houses aren’t just houses, they are what our family calls home. So commit this year to bringing your family home!
Take action:
1. Make a regular monthly appointment with yourself to dedicate to home repair
2. Set up a Trello account to list and prioritize your repair items
3. Subscribe to a very inexpensive monthly assessment program to make sure you know what to look for
4. Work the plan!
Get our free eBook that explains this in more detail!
My best to you all in the year ahead as you work to “Bring Your Family Home”!
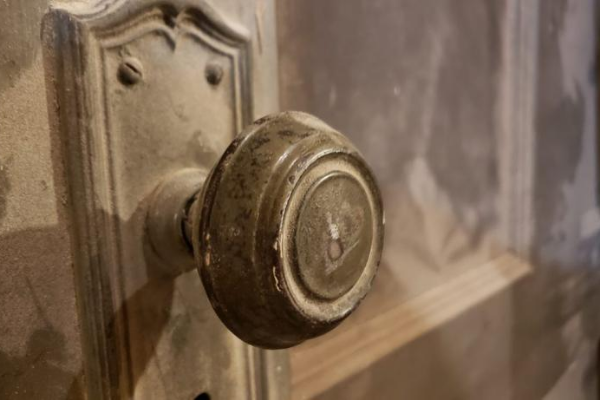
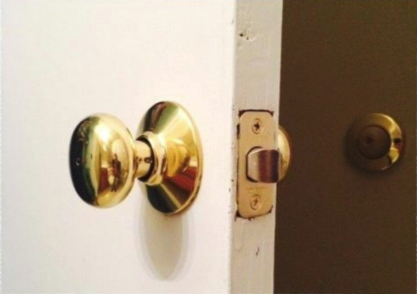
I really love the character of older homes, but they can present challenges when trying to make even basic repairs. Take doorknobs for example. Most older homes have a very small hole in each door for a square threaded shaft, which has a doorknob on each end. Those knobs are usually secured with set screws. While these are quite dependable and well made, the time can come to replace them. You can go the authentic route and purchase restoration equipment, but prepare to pay a hefty price! Most of you will want to follow a little more economic path. Here’s how to install a modern door knob in old doors.
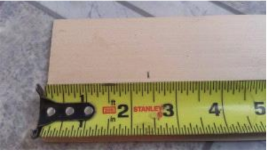
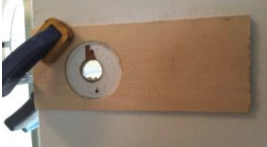
1. Make a jig
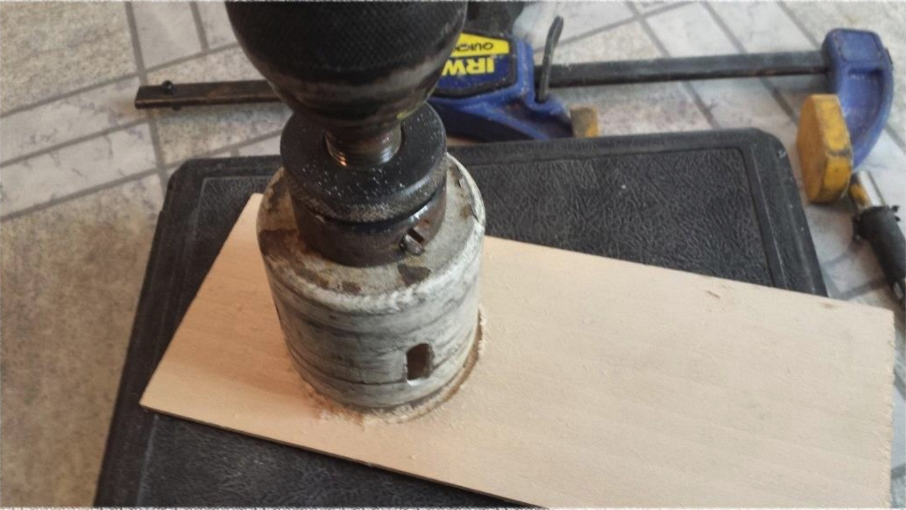
Select a small piece of plywood that you can use as a guide jig for drilling out the door. Check the backset distance of the new doorknob that you want to install (most the time the distance will be 2 3/8′′) and mark it on the jig off of one end of the board. Use your hole saw to drill out the jig with same size hole that will be needed for the doorknob (usually 2 1/8′′). Drill out the jig, centering on the mark.
2. Drill out the door
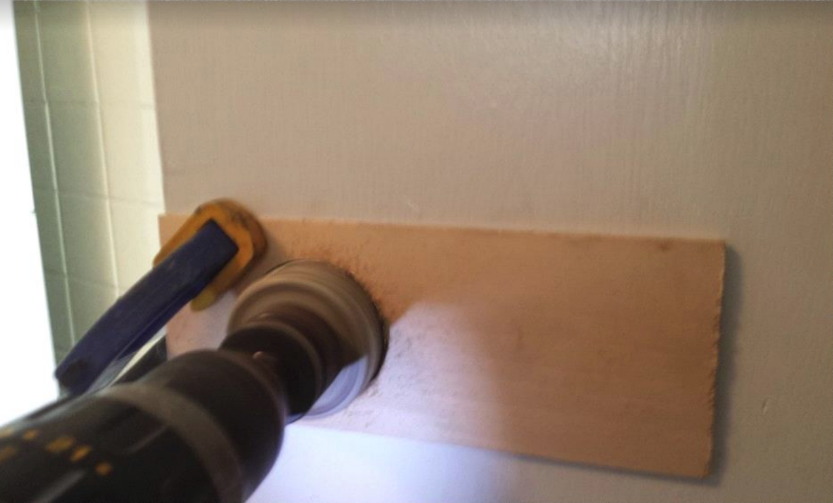
Clamp the jig on the door while making sure that the reference edge, the one that you measured from in step 1, is lined up with the edge of the door. Clamp the jig in place. Now use the same hole saw and drill out the door while using the jig to keep the drill from “walking” on the door. Use caution when drilling through the other side of the door to keep the door from splintering out on the other side. You can put a second piece of plywood on the other side to “back the door” during drilling to avoid blowout.
Clamp the jig to the door with the reference edge lined up on the edge of the door.
3. Install new door knob
Now you are ready to install the new doorknob as you would with any newer type door.
I hope this helps answer your questions about how to install new door knobs in old doors. I encourage you to use the home repair knowledge that you have to make your home a great place for your family!
Please comment below on how you have used this tip or others to help make your home better.
For more learning, our monthly checklists and our free eBook on being a more productive DIYer, visit www.AskHandymanBruce.com
I truly hope that these posts help you to make your home a more peaceful and enjoyable place for your family!
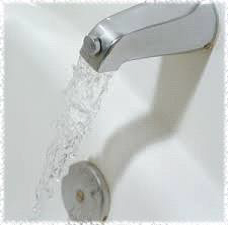
Second or third floor bathrooms are great, but if there is a leak in the shower, it’s hard to know where to start! There are many possible places that a tub or shower can leak water. If you have a leaking shower, then don’t proceed with your repairs until you know these ways to diagnose common problems. Step #1 Test to see if the problem occurs when just the shower runs or does it also appear when water runs from the tub spout (if you just have a shower without a tub, then you will need to modify these procedures slightly). Water running from tub spout Run lots of water out of the tub spout and monitor the wet area. You may have to let it dry up before you can really see if new water is appearing. If the leak is on a drywall ceiling below, then consider cutting a small inspection hole to help evaluate your test results. If you still find water below, then proceed to step #2. If you see no water from this test, then that means that the leak is either in the riser pipe that runs from the valve to the shower head inside the wall OR from water that is splashing inside the shower and finding a way through the surfaces in the shower. The Bucket Test To further narrow down these two options to one, examine the water flow carefully while the shower is running. Does it clearly spray out of the shower head or is there water streaming back to the wall? If water is running against one of the walls, then correct the problem. If you don’t think this is the case then have a helper hold a large bucket under the shower-head while testing again. View inside wall Run the shower this way for 2 or 3 minutes (or for longer if it normally takes longer for the leak to show up) dumping the bucket in the toilet or sink, as needed. Most likely this will prove to keep the leak from showing up because leaks in the pipe behind the wall are very uncommon. If your leak has been kept away by this, then the problem is not inside the wall. You most likely have a problem with a seal in the surfaces of your shower. Caulking and sealing are in order. If, after the bucket test, you’re still getting leaking water below, then you most likely have a problem with the plumbing inside the wall. Find a place to get access and cut a work hole to make the repair. If either of these two results has revealed the problem. No need to go to step two. Just get to work! Step #2 Next let’s do another test. Stop the drain and fill your bathtub with water. Make sure that the drain is holding water and not seeping through. Fill tub with water You can usually hear the water seeping if you turn off the water and listen carefully. Let the water stand in the tub for several hours and see if the leak is present. If so, then the problem is on the top side of the tub where the drain assembly is supposed to seal to the tub. The solution is to unscrew the drain assembly and reseal it with plumbers putty (or clear silicone if you have a cultured marble tub). You have found your problem! If your test results in no water, until you un-stop the drain that is, then you can proceed to step #3! Step #3 Now let’s look further down. We have isolated the problem to below the tub surface. Cross section of tub drain In the image above you will see the bath drain shoe. On the bottom of the tub is a thick rubber seal that is pulled tightly up against the bottom of the tub by the drain shoe to keep water that goes down the drain from leaving the constraints of the pipe. This is your next most likely spot to have a problem. This seal can dry up and crack over time and lose its ability to seal. This can be replaced from the top by removing the drain assembly and slipping a new one through the drain hole and resting it under the tub. Reinstall the drain assembly with plumber’s putty or clear silicone. In cases where the bottom of the tub is visible, simply look at the connections on all the pipes while water is running through them and determine where the leak is. It’s not so easy when the ceiling below hides all this from your view. In many cases the best way to diagnose and repair it at this point is to cut out a work hole below and patch it after the repair is complete. Step #4 If you pass all these tests and still have a leak when the water is running, then you probably have a damaged place in a pipe. Carefully cut into the ceiling or wall to expose the problem area At this point you can start cutting into the ceiling or walls to find the leak knowing that you did everything you could to eliminate the simpler solutions. Always be careful when cutting into a wall. Proceed slowly with a hand saw to avoid damaging a pipe or wire. It can cause serious injury, if proper care is not taken. So let’s review: Step #1 Test to see if the problem occurs when just the shower runs. Step #2 Next let’s do another test. Stop the drain and fill your bathtub with water. Step #3 Now let’s look further down. The bottom seal can dry up and crack over time and lose its ability to seal under the tub. Step #4 If you pass all these tests and still have a leak when the water is running, then you probably have a damaged place in a pipe. I hope that this helps you when diagnosing a drain leak in your tub or shower. For more learning, our monthly checklists and our free eBook on being a more productive DIYer, visit www.AskHandymanBruce.com I truly hope that these posts help you to make your home a more peaceful and enjoyable place for your family! Handyman Bruce www.HouseRepairsYourself.com “Bringing your family home!”
There are several areas on a roof that can cause water problems, but this the most common problem that I find: Damage to the flashing around plumbing vent pipes! Learn how to avoid water damage to your home. There are two main types of pipe flashings.
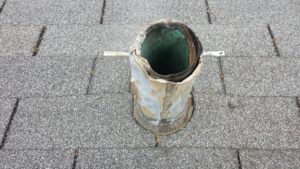
Lead Pipe Flashing that won’t Avoid Water Damage
Chewed lead roof flashing
Here is a lead flashing that has been chewed on by squirrel, most likely. This will not help you avoid water damage to your home!
This type of flashing is normally used around a cast iron plumbing vent. The lead should surround the pipe and the extra should fold over the top of the pipe, toward the inside. That causes the rain water to run on the outside of the flashing or in the pipe, which are both fine. The problem that has been caused by the squirrel chewing the top of the lead is that now water can get between the pipe and the flashing. This allows the water to go right into your attic! Best case scenario is that it causes a stain on your ceiling. At the worst, it will cause ceiling and framing damage or mold to grow in your attic!
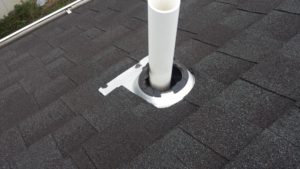
Neoprene Pipe Flashing that won’t Avoid Water Damage
Another type of pipe flashing is the neoprene flashing. This type is most commonly used over a PVC plumbing vent. This type is made to snugly slide over the PVC pipe and create a seal near the roof line. The rain water, in this case, can run on the inside of the pipe or on the outside, but when it hits the neoprene seal, it runs over the flashing and down the roof.
Brittle and damaged neoprene roof flashing
Look at this failing seal. You need to learn to spot problems here if you want to avoid water damage to your home. The neoprene has gotten brittle and cracked. This one is very advanced and has been leaking for months, I’m sure! Usually, I find them with a small crack in the neoprene that just lets a small amount of rain water through.
In either case, doing a quick annual inspection of the roof will allow you to catch this problem before it becomes a big problem! Above all, if you’re a DIY homeowner, you should know what to assess each month on your home to protect your asset and keep your home serving your family well.
For our monthly checklists and our free eBook on being a more productive DIYer, visit www.AskHandymanBruce.com
I truly hope that these posts help you to make your home a more peaceful and enjoyable place for your family!
Okay, first we’re gonna take a diamond wheel and a grinder, and maybe a shop vac to control dust, and we’re gonna grind out the shape of the electrical box. Then, we’re gonna cut a pathway down the wall and chisel out the remaining material to allow a nice chase for the wire to run.
Next, we’re gonna drill around the perimeter of the box with a masonry drill to try to remove more of the material. The rest of it can be chiseled out with a masonry chisel.
Next, we’re gonna drill from our pathway for the wire into the box chamber so that our wire can fit nicely in place. Yours might be slightly different, but you get the idea.
Now once everything fits into place, we can seat the box into the wall with some expanding spray foam. Now what I’ve done ahead of time is cut a prop stick for it so that once I spray it, I can prop it in place and let it dry overnight so that it sits nice and tight. In our case, we ran Romex down the wall, but in some local areas you need to use shielded cable like MC wire or something, but you get the idea there too.


 Water running from tub spout Run lots of water out of the tub spout and monitor the wet area. You may have to let it dry up before you can really see if new water is appearing. If the leak is on a drywall ceiling below, then consider cutting a small inspection hole to help evaluate your test results. If you still find water below, then proceed to step #2. If you see no water from this test, then that means that the leak is either in the riser pipe that runs from the valve to the shower head inside the wall OR from water that is splashing inside the shower and finding a way through the surfaces in the shower. The Bucket Test To further narrow down these two options to one, examine the water flow carefully while the shower is running. Does it clearly spray out of the shower head or is there water streaming back to the wall? If water is running against one of the walls, then correct the problem. If you don’t think this is the case then have a helper hold a large bucket under the shower-head while testing again.
 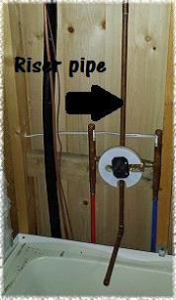 View inside wall Run the shower this way for 2 or 3 minutes (or for longer if it normally takes longer for the leak to show up) dumping the bucket in the toilet or sink, as needed. Most likely this will prove to keep the leak from showing up because leaks in the pipe behind the wall are very uncommon. If your leak has been kept away by this, then the problem is not inside the wall. You most likely have a problem with a seal in the surfaces of your shower. Caulking and sealing are in order. If, after the bucket test, you’re still getting leaking water below, then you most likely have a problem with the plumbing inside the wall. Find a place to get access and cut a work hole to make the repair. If either of these two results has revealed the problem. No need to go to step two. Just get to work! Step #2 Next let’s do another test. Stop the drain and fill your bathtub with water. Make sure that the drain is holding water and not seeping through.
 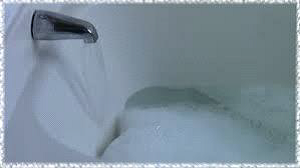 Fill tub with water You can usually hear the water seeping if you turn off the water and listen carefully. Let the water stand in the tub for several hours and see if the leak is present. If so, then the problem is on the top side of the tub where the drain assembly is supposed to seal to the tub. The solution is to unscrew the drain assembly and reseal it with plumbers putty (or clear silicone if you have a cultured marble tub). You have found your problem! If your test results in no water, until you un-stop the drain that is, then you can proceed to step #3! Step #3 Now let’s look further down. We have isolated the problem to below the tub surface.
 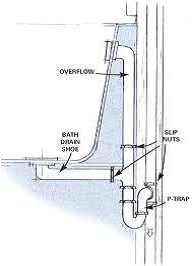 Cross section of tub drain In the image above you will see the bath drain shoe. On the bottom of the tub is a thick rubber seal that is pulled tightly up against the bottom of the tub by the drain shoe to keep water that goes down the drain from leaving the constraints of the pipe. This is your next most likely spot to have a problem. This seal can dry up and crack over time and lose its ability to seal. This can be replaced from the top by removing the drain assembly and slipping a new one through the drain hole and resting it under the tub. Reinstall the drain assembly with plumber’s putty or clear silicone. In cases where the bottom of the tub is visible, simply look at the connections on all the pipes while water is running through them and determine where the leak is. It’s not so easy when the ceiling below hides all this from your view. In many cases the best way to diagnose and repair it at this point is to cut out a work hole below and patch it after the repair is complete. Step #4 If you pass all these tests and still have a leak when the water is running, then you probably have a damaged place in a pipe.
 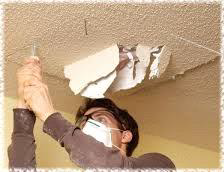 Carefully cut into the ceiling or wall to expose the problem area At this point you can start cutting into the ceiling or walls to find the leak knowing that you did everything you could to eliminate the simpler solutions. Always be careful when cutting into a wall. Proceed slowly with a hand saw to avoid damaging a pipe or wire. It can cause serious injury, if proper care is not taken. So let’s review: Step #1 Test to see if the problem occurs when just the shower runs. Step #2 Next let’s do another test. Stop the drain and fill your bathtub with water. Step #3 Now let’s look further down. The bottom seal can dry up and crack over time and lose its ability to seal under the tub. Step #4 If you pass all these tests and still have a leak when the water is running, then you probably have a damaged place in a pipe. I hope that this helps you when diagnosing a drain leak in your tub or shower. For more learning, our monthly checklists and our free eBook on being a more productive DIYer, visit
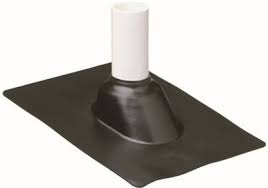 This type is most commonly used over a PVC plumbing vent. This type is made to snugly slide over the PVC pipe and create a seal near the roof line. The rain water, in this case, can run on the inside of the pipe or on the outside, but when it hits the neoprene seal, it runs over the flashing and down the roof.